
When you Factory Reset your iPhone, all of your data and settings are erased, and your device is reset to its factory default settings. This guide will walk you through the steps of Factory Resetting your iPhone.
Factory Reset iPhone
If you are selling, giving away, or taking your phone in for repairs, or if your device is giving you unfixable problems, you may want to Reset iPhone to its factory default settings.
Furthermore, if you’re selling or giving away your mobile, a factory reset ensures that all of your data, images, messages, accounts, and passwords are deleted from the device.
Assume your iPhone has become glitchy and is causing you unresolvable problems. In that case, you can Reset iPhone to Factory Defaults and Set it up as a New iPhone, or you can restore it from a solid backup.
So, let’s get started with the methods for Resetting iPhone to Factory Defaults on a Windows PC using Settings, Mac, and iTunes. Please keep in mind that to Reset iPhone on a Mac or Windows computer, you must first disable Find My iPhone.
1. Factory Reset iPhone Using Settings
The Settings App on your iPhone is probably the simplest way to Reset iPhone to Factory Default Settings.
1. Go to Settings > General > scroll down and select Reset.
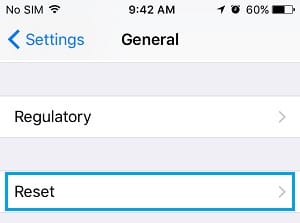
2. On the next page, click Erase All Content and Settings.

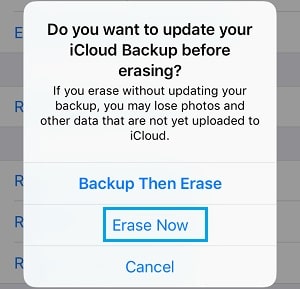
3. Click Erase Now on the confirmation pop-up unless you want to backup your device first and then erase it.
4. Once the Reset process is finished, your iPhone will boot up to the “Hello” or Welcome Screen.
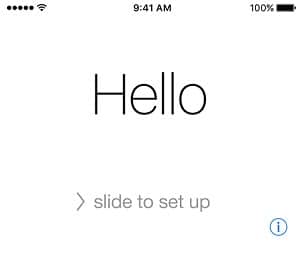
5. To configure your iPhone, follow the onscreen instructions until you reach the “Apps & Data” screen.
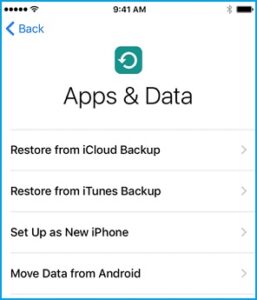
You have the option to Set Up as New iPhone (ideal for selling or giving away an iPhone) or Restore iPhone from Backup on this screen (Mac or Windows computer).
2. Factory Reset iPhone on Mac
If you have a consistent backup of your iPhone on your computer, you can reset to factory default settings and Restore iPhone from the backup file.
1. Use the Lightning to USB connector that came with the iPhone to connect it to the computer’s USB port.
2. To unlock the iPhone, enter your Lock Screen Passcode.
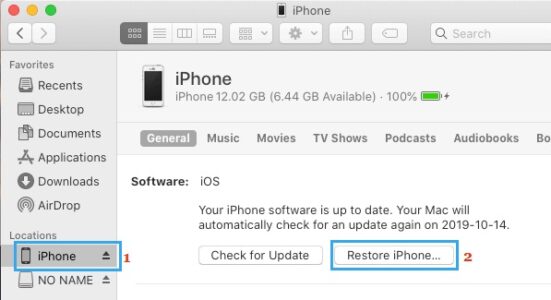
3. Next, in the bottom menu bar of your Mac, click on the Finder Icon.

4. Select your iPhone in the left pane of the Finder screen. In the right pane, under the “Software” section, click the Restore iPhone button.
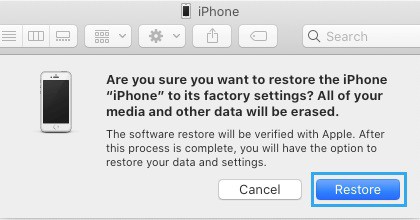
5. On the confirmation pop-up, click the Restore button to confirm.
6. Wait for your phone to be restored to factory default settings.
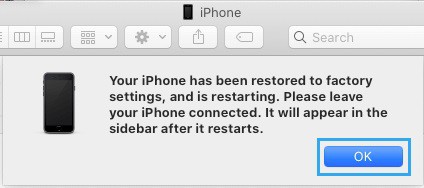
7. When your iPhone has been restored, press OK and wait for it to appear in the Finder sidebar.
8. Your iPhone will restart with the “Hello” screen after restoring it to factory default settings.
9. To configure your iPhone, follow the on-screen instructions until you reach the “Apps & Data” menu.
On this screen, you’ll see the options to Set Up as New iPhone, Restore from iCloud Backup, and Restore from iTunes Backup. Of course, you are free to select any solution that best meets your requirements.
After you’ve configured your device, it should be free of any issues preventing it from functioning normally.
3. Factory Reset iPhone on Windows Computer
You can use iTunes to Reset iPhone to Factory Default Settings if you have a Windows computer.
1. Open iTunes on either your Windows or Mac computer.
2. Use the Lightning to USB cable that came with your iPhone to connect it to the computer.
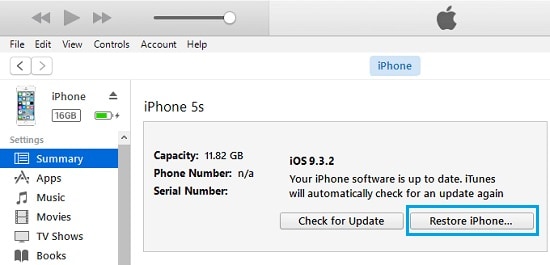
3. In iTunes, select the phone icon that appears on your computer’s screen.

4. Next, select the Summary tab from the left pane. In the right pane, click the Restore iPhone button.
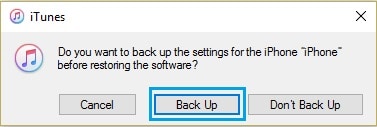
5. On the next pop-up, select either Back-Up or Don’t Back Up to begin the Factory Reset process on your iPhone.
6. When the Reset Process is finished, your iPhone will return to the “Hello” screen.
7. To configure your iPhone, follow the onscreen instructions until you reach the “Apps & Data” menu.

From this screen, you can choose to Set Up as New iPhone, Restore iPhone from iCloud Backup, or Restore iPhone from iTunes Backup.
After you’ve configured your device, it should be error-free and fully functional.