Well, you can use port forwarding to set up a Minecraft server, gain remote access to your files and desktop, and much more. Even while Minecraft ports to forward may appear complicated, it is pretty simple to understand the concept and how it works. Using a Mac or Windows 10 PC, you can easily Forward Ports on a Router.
What is Port Forwarding?
Using port forwarding may force your router to connect with particular devices over a specific port. However, as long as you set a port for your devices, your router will accept requests for those ports and pass data to a particular device’s private IP address.
Port forwarding is easier to grasp if you have a basic knowledge of how routers work. Using a local area network, your router broadcasts an internet signal to all your devices (LAN). An IP address is given to every device in the network by the router. 192.168.0.2 or 10.0.2 are two examples of private IP addresses that you can use with your laptop or desktop computer.
Additionally, a port number is assigned to each device’s apps and services. For example, 192.168.0.2:80 or 10.0.0.2:80 is the IP address of an app running on your computer.
Thanks to this unique IP address and port number, your router knows which software or service to communicate with. In addition, it enables remote access to your local area network (LAN) devices and programs via a vast area network (WAN) (WAN).
Port Forwarding Not Working
Log in to your router and navigate to the port forwarding section to begin the process of forwarding ports. The next step is to enter the port numbers and the IP address of your computer. Finally, save your changes by selecting a forwarding protocol.
How to set up Port Forwarding
To be safe, you should consider upgrading your router if you don’t see a port forwarding setting.
1. Open a web browser. You can use Firefox, Chrome, Safari, or any browser you want.
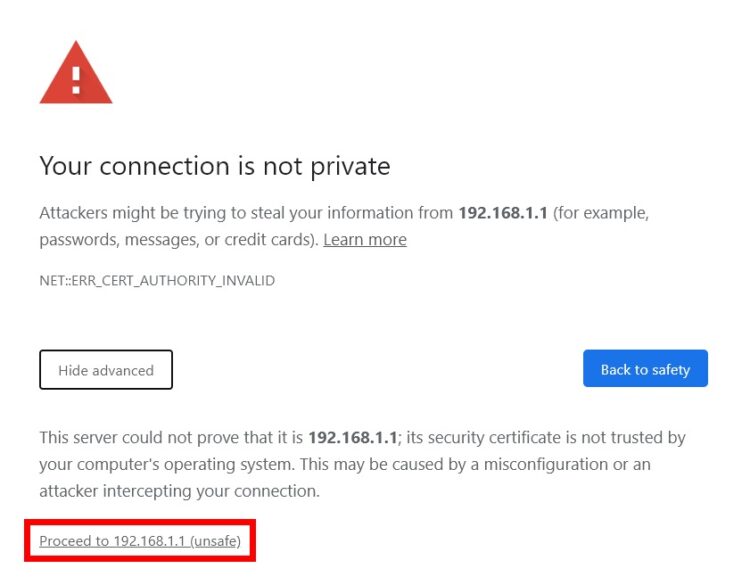
2. Afterward, type your router’s IP address into the address bar. It should be a series of numbers such as 192.168.X.X or 10.0.X.X. Also, you must ensure to take note of your computer’s IP Address because you probably need this info later.
Note: If you visit your router’s IP address, you may see a privacy notice informing you that it is hazardous to do so. To proceed, select Advanced > Proceed from the drop-down menu.
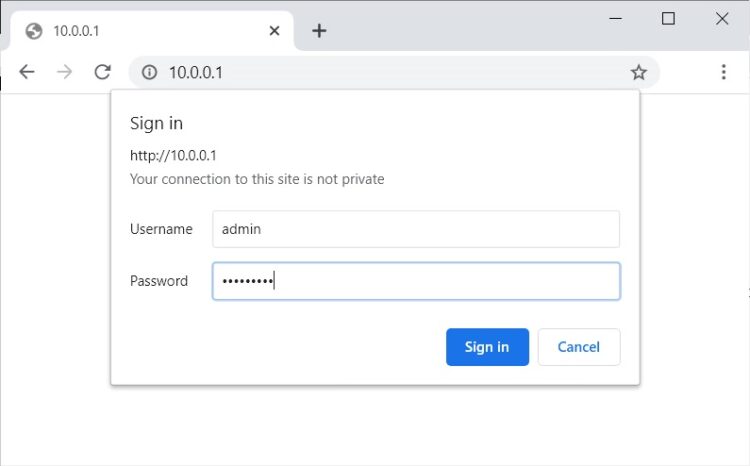
3. Now, enter your router’s username and password.
4. Go to your router’s port forwarding settings. Your router’s specific processes for getting to the correct settings will differ. NAT, Security, Gaming, Advanced Setup, Firewall, and Virtual Servers may all be found under the Advanced tab.
5. Next, create a new port forwarding rule. Some routers require you to tap Add New, Add Custom Service, or something similar.
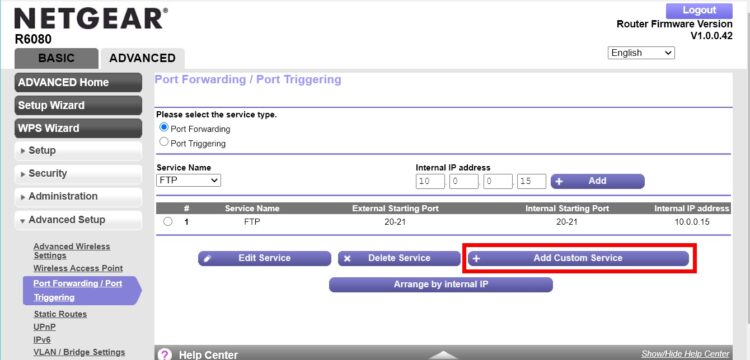
6. Then, enter a name for the service or app. You can give this any name you need. However, it is recommended that you use one that allows you to identify the rule you’ve created.
7. Then, enter the desired port number. Selecting multiple ports with commas and spaces may be done on most routers. Internal and external ports should, whenever possible, be the same.
For example, you can choose a number between 0 to 65,535, but only ports 0 to 1023 are reserved for privileged services & are designated as well-known ports. Besides, you can find a full list of ports and their related services here.
Note: Ports 80 and 21 are two of the most frequent ports to open for handling requests to open websites. Port 25565 should be used while running a Minecraft server.
8. Then, choose a port forwarding protocol. You’ll typically see the option to set your service type to TCP, UDP, TCP/UDP, Both, or All. Which one you select will depend on the kind of connection recommended for the specific app. However, you usually choose the TCP/UDP option, Both, or All.
ALSO READ: Forget WiFi Network
9. After that, type in your computer’s IP address. Most routers give fields where you can enter the IP address of your device. Even routers let you select a device instead of typing in the device’s IP address.
Note: If you have not specified a static IP address for your device, your IP address may change when you turn your device off, reset your router, or your Internet service provider (ISP) changes your IP address. A device’s settings are the only ones to set a static IP address.
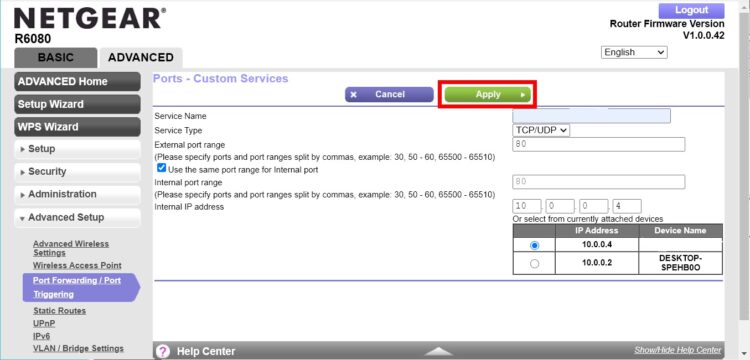
10. At last, save your settings. Most of the time, you’ll be able to tap on buttons that say Save or Apply. However, other routers require you to tap on Enable before hitting Save.