Google Chrome, like many other Windows 10 apps, makes some changes to the Windows registry when you install it. These changes are essential for Google Chrome to be implemented. The Chrome browser also has a smooth reset feature to reset everything to its default value if something breaks. That said, the reset doesn’t seem to fix it all. However, Google Chrome is not working for some Windows 10 users with a registry problem. We will talk about how to Fix Google Chrome Not Working on Windows 10 in this post. Let’s start!
If you get ERR_TIMED_OUT errors in Google Chrome frequently, even if other browsers are working well, here is what you have to do.
Way to Fix Google Chrome Not Working on Windows 10
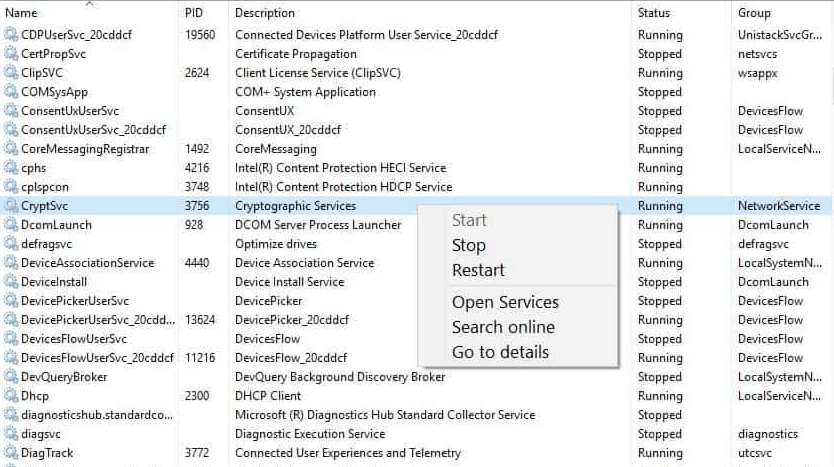
Before you guys apply this easy solution, you must first check whether it works for you. You must open the Task Manager and go to the Services tab. Sort the service alphabetically by name and search for the CryptSvc service. Tap it right and select ‘Reset’ from the context menu. After that, you must check whether or not Chrome works. If so, then this fix will fix long-term Chrome as well.
You must open the Windows registry editor by tapping on the Win+R keyboard shortcut. It opens the run box. Type Regedit then and tap Enter. You will need the administrative rights to edit the registry.
Go to the following location:
HKEY_CURRENT_USER\Software\Microsoft\SystemCertificates\Root
You need to backup the root key before you do anything. Then, right-click ProtectedRoots and select Permit from the context menu. You must select your user in the window that opens and activate ‘Full Control‘ for it. Take another Root key backup.
Now open the Task Manager again and stop the CryptSvc service. Next, delete this location’s Root key.
HKEY_CURRENT_USER\Software\Microsoft\SystemCertificates
Google Chrome Not Opening on Windows 10?
Now Restart Windows 10, and you should fix your problem too. If you still have Google Chrome problems, you should reset it. You must first back up your Google Chrome profile folder. To reset Chrome, open it, and tap the top right button for more options. Now select Settings from the menu. Tap Advanced and scroll down the Settings page. Tap Advanced. Scroll down to the bottom once again. You will see an option called ‘Restore your original defaults’ there.
Confirm that you want or don’t want to reset Chrome. The reset won’t remove your history, bookmarks, or passwords because you’re dealing with a Chrome buggy. Make sure you made a backup of your Chrome profile folder, to begin with.
This is an old bug that hit Windows 10 users build 10.0.17134.376, and it’s also recognized in Google’s help forums.
Conclusion:
Okay, that’s all! I hope this “Google Chrome Not Working” Post will help you and find it helpful. Provide us with your feedback also if you have additional questions and problems related to this post. Then let us know in the following comment section. We’re going to get back to you soon.