
For new Mac users coming from a Windows background, the lack of a Print Screen Key on the MacBook is annoying. As a result, I’ve included instructions or simple methods for printing a screen or taking a Screenshot on a Mac.
How Screenshot on Mac
Unlike Windows computers, MacBooks lack a dedicated Print Screen Key and will not support it even if a Windows Keyboard is connected to the Mac.
As a result, the only way to print a screen or take a screenshot on a Mac is to use Apple’s Keyboard Shortcuts in its macOS software.
Unlike Windows’ Print Screen function, macOS assigns Keyboard Shortcuts to provide more functionality, allowing users to take or capture the entire screen or a specific area of the screen.
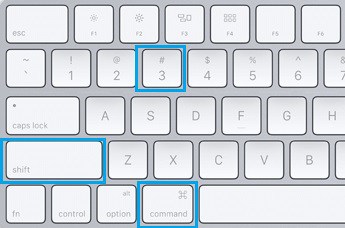
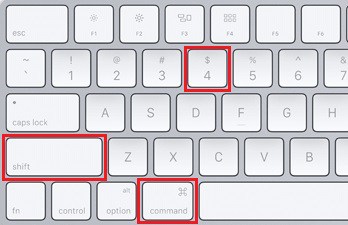
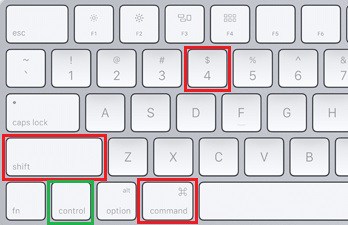
For example, pressing Command + Shift + 3 keys in a Screenshot captures the entire screen of Mac, whereas the Command + Shift + 4 keyboard shortcut captures a selected portion of the screen in a Screenshot.
Furthermore, pressing Command + Shift + 3 takes a screenshot of both if you have two monitors.
1. Take Screenshots of the Entire Screen on Mac
To take a screenshot of your Mac’s entire screen or desktop, follow the steps outlined below.
1. Press Command + Shift + 3 on your Mac’s keyboard.
Note: If you’re using a Windows keyboard on your Mac Mini, press Windows + Shift + 3 at the same time.
When you press the above key combination, your Mac’s entire screen is captured in a Screenshot and saved as a (.PNG) File on your MacBook’s desktop.
2. Right-click on the saved Screenshot File and rename it to something descriptive of the Screenshot’s content, if necessary.
2. Take a Screenshot of the Selected Areas on Mac
If you’re on Twitter or another website, use the Command + Shift + 4 keyboard shortcut to capture any Tweet, Photo, or section of an article that appears on the website.
1. On your Mac’s keyboard, press the Command + Shift + 4 keys to switch the mouse pointer to Crosshair mode.
Note: To use a Windows computer on a Mac Mini, press Windows + Shift + 4 simultaneously.
2. Now, using the mouse or trackpad, select the portion or area of the screen to capture in the screenshot and release the mouse button.
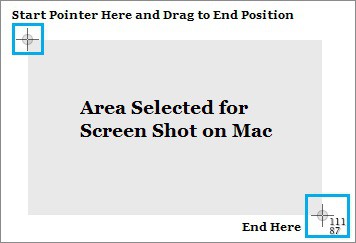
3. When you release the mouse button, you will hear a shutter sound, and the Screenshot will be saved as a (.png) file on the desktop of your MacBook.
3. Print Screen to Clipboard on Mac
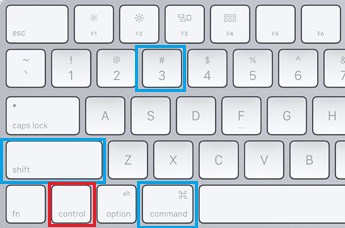
When you take a Screenshot on a Mac, it is saved to the Clipboard as well. It allows you to copy and paste the screenshot into Microsoft Word, Excel, and other programs.
1. On your Mac’s keyboard, simultaneously press Command + Control + Shift + 3.
Note: If you’re using a Mac and a Windows keyboard, press Windows + Control + Shift + 3 simultaneously.
2. Your Mac’s entire screen or desktop will be saved to the Clipboard, and you can paste the Screenshot into any App using the Command + V shortcut.
4. Save Print Screen of Selected Portion to Clipboard on Mac
Similarly, taking a screenshot of a specific portion or area of the screen saves it to the Clipboard and allows it to be pasted into any Document, Spreadsheet, or App.
1. On your MacBook’s keyboard, press Command + Control + Shift + 4 to activate Crosshair mode.
Note: If you’re using a Windows keyboard on your Mac Mini, hold down Windows + Control + Shift + 4 simultaneously.
2. Now, using the Mouse or Trackpad, select the screen area to be captured in the screenshot and let go of the mouse key.

You’ll hear the Screenshot sound right away, and the screenshot will be saved to your Mac’s clipboard.
Furthermore, use the Command + V keyboard shortcut to paste the screenshot into any app or anywhere on your Mac.