Connecting your Chromecast to other devices requires WiFi. A single WiFi network is stored in Chromecast’s memory at a time. Changing networks will necessitate wiping and resetting your Chromecast. Many users encounter many issues, including Chromecast can’t connect to WiFi or connect Chromecast to WiFi. So, here’s how you can easily change your WiFi Networks on Chromecast in various ways.
How to Change WiFi on Chromecast
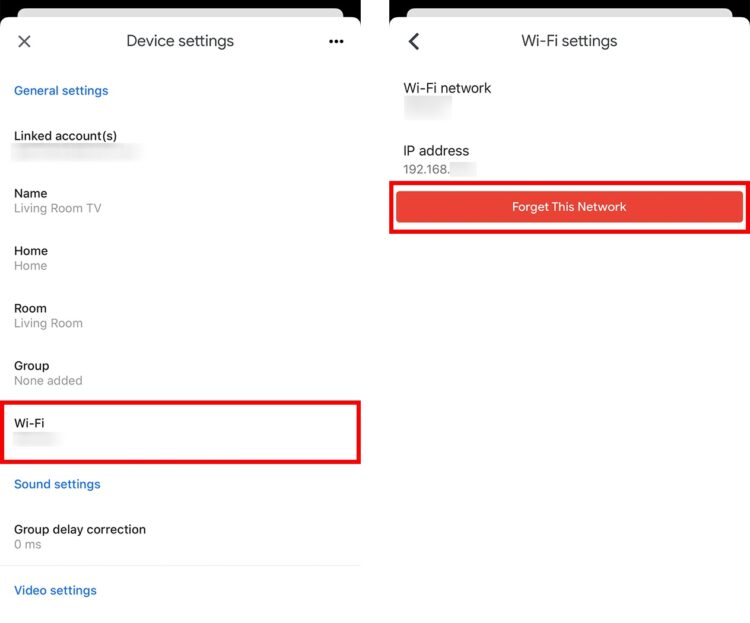
Start the TV and the Google Home app to modify your WiFi network settings on a Chromecast. Finally, hit the gear icon on the top-right of your screen to select your device. Tap WiFi > Forget this Network, and you’re all set.
To begin, make sure your smartphone or other device is connected to the same network as the Chromecast. If it doesn’t connect to the same network, you’ll need to perform a factory reset on your Chromecast. The steps in the following paragraphs will show you how to change your WiFi Networks on Chromecast.
1. Plug in your Chromecast and turn on the TV. If you see the light on the Chromecast, it’s on and ready to stream content.
2. Open the Google Home app. You can find this app on the Apple App Store & the Google Play Store for free.
3. On your device, choose your Chromecast. It’ll have the name that you gave it during the setup process. For example, it might be something like “Living Room TV.”
4. Then click the gear icon in the upper-right corner of your screen.

5. Next, choose WiFi.
6. Then click Forget this Network.
7. When you forget your Chromecast Wi-Fi network, you can change it by setting up your device again.
It’s possible that you won’t be able to reconnect Chromecast to new WiFi network. Your Chromecast will need to be reset if this is the case. By re-configuring it, you’ll be able to use it on the new network.
How to Change WiFi Network by Manually Resetting Your Chromecast
It is possible to perform a manual reset of your Chromecast by pressing and holding down the device’s reset button. After that, reattach the Chromecast’s USB power cable.
1. To begin, press and hold down the reset button. The reset button is on the side of your Chromecast, close to the micro-USB port. If you press this button long enough, the LED light will stop flashing orange and begin flashing white. You can find the reset button on the back of your Chromecast if you’re using a first-generation model. Likewise, the light on your streaming device will cease flashing if you press and hold the button.
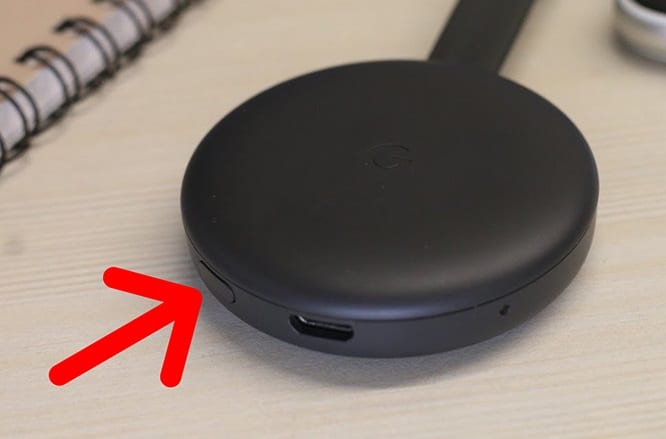
2. Disconnect the USB power cable. Now, wait for a few seconds.
3. Afterward, reconnect the USB power cable. It will reset the device to factory conditions.
4. When you reset Chromecast, you’ll have to set up your device again.
Chromecast Setup
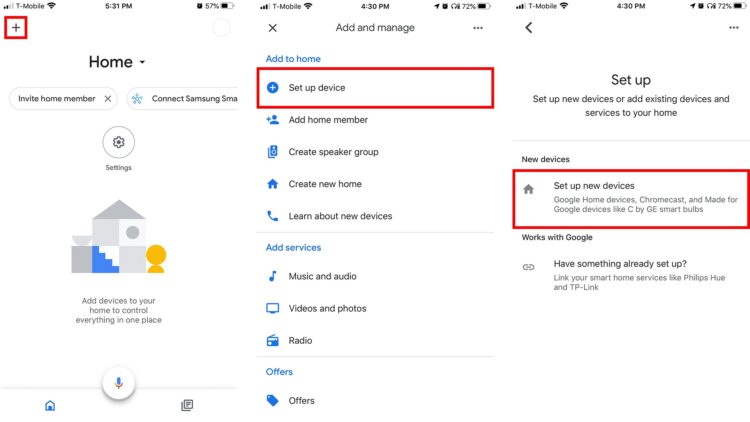
1. Open the Google Home app and click the plus sign in the upper-left corner of your phone’s screen.
2. Then choose Set up device.
3. Next, choose Set up new devices.
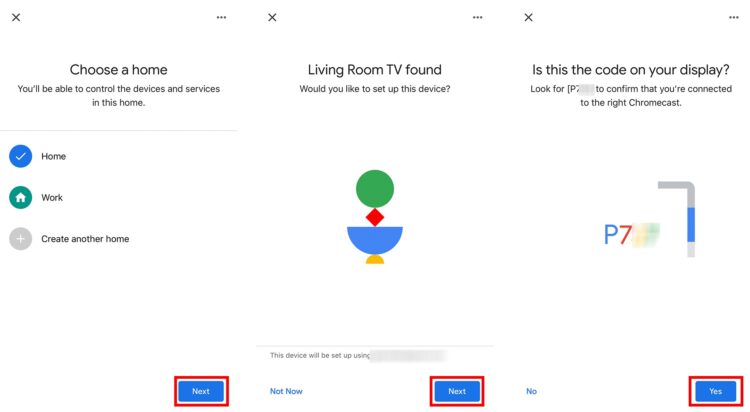
4. Select or create a home and tap Next.
5. Now, wait for the app to discover the device and click Next.
6. Wait for the app to connect to the device.
ALSO SEE: Cancel a YouTube TV Subscription
7. After that, tap Yes to confirm that you see the code on your TV. If you do not see the same code, click No and tap Scan for devices.
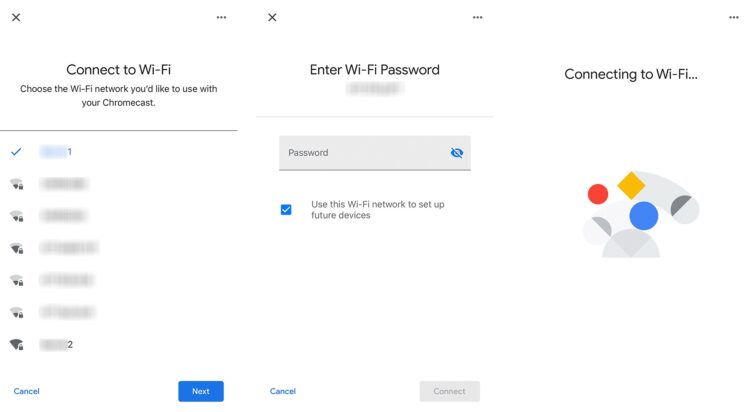
8. Next, follow the onscreen instructions until you see the page that says, “Connect to Wi-Fi.” Here is where you’ll choose a new WiFi network to connect to. You might be asked to enter the Wi-Fi password at this point.
9. Wait for your device to connect to your Wi-Fi network.
10. When you notice a screen that says, “Linking your Chromecast,” you can hit continue or tap the X in the upper-left corner to start using your device